Tuesday, 21 September 2021

iCraft - Cuteness, Love and Flowers


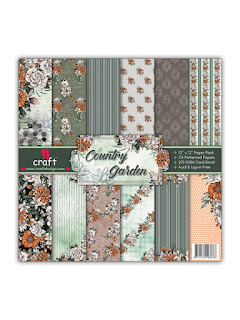
The beautiful iCraft paper range called Country Garden was perfect for a layout with lots of fussy cutting. 

Prepare  your wooden embellishments with chalk paint. For the honey comb pieces paint with Minnesota Pines mixed with some white gesso. This creates a softer green to compliment the back ground colours.  Paint the words and heart arrow with the full colour of  Minnesota Pine. Add some lightness, use watered down white gesso to take down the solid colour . Paint the leafy wooden pieces, with Deep Waters. Once dry, dab watered down white gesso to add depth to the painted surface. 

Assemble your layout - mat your photo on 3 pieces of complimenting papers and use foam tape between the layers. I always align slightly off centre which adds a feature to the layout. I started with a base paper that also featured flowers and added in a range of fussy cut flowers of various sizes to sweep the blooms from the top left around the photo and bottom right up on the left hand size. Arrange your flowers on the layout adding some foam tape to raise the top ones to add depth. Once adhered, slide the wooden embellishments under the floral arrangement making sure that is is off centre. To finish off, I added some watered down Deep Waters chalk paint under some of the flowers to add depth to the background. 

I have added some close up photos of the layout and some of the products used. 

For a full range of iCraft products, please follow the link bellow:

https://tinamarie.com.au


  https://tinamarie.com.au/product/wooden-embellishment-i331/


Saturday, 21 August 2021

Beautiful - iCraft Australia


Hi iCraft friends - It was time to do a pretty scrapbook layout and the beautiful Purple Blossoms paper range was perfect for a photo of my Mum and Granddaughter. I loved the   layering that you could do with the wooden embellishments, fussy cut pieces and cut outs in the paper range. I also wanted to add a small amount of mixed media to give the layout some texture and depth. 

I applied a mixture of modeling paste and Jasperware chalk paint with a stencil (8563) randomly on the page - focusing on the top and bottom left side as well as bottom right hand side. The aim is so you could see parts of the stenciled pattern. Before it was completely dried, sprinkled Arty Balls and Crystal shimmer on top. You only want a bit to catch in the wet paste. While I waited for it to dry, I fussy cut the purple flowers, leaves from the paper range as well as painting the wooden Embellishments - frame and word in Wine and Dine Chalk paint and the foliage in Minnesota Pine. To add some extra layering, I cut out some of the hanging flowers from the other pieces of paper and some of the 'notes' embellishments

You can start layering. Tip: start with your photo and frame and raise it with foam tape so that you can work around it. I always adhere my main photo first so I can place some pieces underneath. 

Once you are happy with you layering, glue or tape down. For some of the leaves, I also raised on foam tape so that they were raised up and added some depth to the layout. 
Tip: Move your flowers and leaves around placing some on top until you are happy with the layout and then glue down. I sometimes take a photo with my phone of where I want everything just in case I have to move pieces and don't want to forget where I was putting them. 
Final tip: if you have a layout that is focused all on one side, it is always good to balance it out with something on the other side. Doesn't need to to be big, even some flowers, a word or cluster of small tags. However in the end it is your layout so do what you feel is right for you. 


I have added some close up photos of the layout and some of the products used. 

For a full range of iCraft products, please follow the link below:

. 
I hope you enjoy and would love to here from you in the comments bar below. Have a great day :) 


Wednesday, 21 July 2021

Craft on The Run - Mintay Childhood - Using Photo Mat pages


Hi Everyone - Rosalie here and back using one of my favourite MIntay paper ranges - Childhood. 

One of the challenges people find with some papers, is what to do with photo mat papers. Often you end up with a couple of photo mats used and a left over piece of paper that you just don't know what to with. 

To help with some ideas, I have created a layout using the photo mat page from the Mintay Childhood range which uses all of the pieces in the photo mat paper in the layout and features 6 - 3x4 photos. 

This layout can be used for any of the  photo mat pages from the Mintay range. 

 I have used 3 pieces of the Mintay Childhood range and 1 piece of card stock (red). You can use any colour base card stock that  compliments the paper range. 


Start by trimming the centre out of the red card stock. I like to save these pieces for other layouts when I need to photo mats, however you don't need to if you prefer not to cut the centre's out. You wont be using this centre piece for this layout. 


Trim the blue and white star paper (B side) 1/4 inch from the top and right side. Adhere to the red cardstock as your base. You can distress edges if you want to. For this layout I didn't distress edges. 

Next, take your photo mat page and select 6 of the rectangles that you would like to use for your fussy cutting. I selected the ones with the backpack and larger pictures to fussy cut. The other 6 will become your photo mats. 


Fussy cut the 6 photo mats that you will use for your lay out. 


Stick the 6 photo mats to your base page using foam or chip board to give height. I have put a small piece of foam tape in the centre to start with as you will need to be able to slide your embellishments under when you are assembling. I have attached my 6 photo mats approximately 11/2 inch from the top and 13/4 from the left side. 


I have also fussy cut extra embellishment's from the fussy cut page. I have circled the ones that I have used however you can add as many as you like. 


Start to assemble your fussy cut pieces around your photo mats. The aim is to make sure that you have some pieces under the photo mats, so you can just see them and also raised up and slightly over your photos. If it helps, put your photos on and that will give an a guide of what parts of the photos will be covered by the fussy cutting. 


Add the remaining fussy cut pieces from the page. Again, you may want to have many of the pieces 'peeking' out from under the larger fussy cut pieces. It is also a good way to fill in some of the negative space. I have used foam tape to raise some of the smaller pieces such as the pencil and blue ball behind the scooter on the left. When you are happy stick every thing down including your photos. 


Finally - add some titles. I have added chipboard over the photos. I will also add  journaling later and will put that under the photos to the left side. 

I hope you have enjoyed my layout and would love to see some of your layouts using some or all of my ideas. 


Monday, 5 July 2021

MIntay Childhood Range - Craft on the Run

 Mintay Childhood Paper Range - fussy cutting and page layout. 


Many of you know me as all about mixed media especially as most of my classes that I teach at Craft on the Run have lots of different mediums. However one of my other loves, is Mintay papers. It gives me a chance to relax and do some fussy cutting as well as create layouts that have depth and interest. 

One of the challenges when using very busy paper is doing a layout where you can still see the lovely features of the paper as well. 

I have used the following papers of the beautiful Childhood Range. I used 4 pieces of paper - 2 x 02 (tree house page), 1 x 06 (multiple 3 x 4 in elements page) and 1 x fussy cut elements page.  You will need 3 - 3x4 photos (may need to trim to fit photos mats). 


I have set out instructions below however you can refer to the main finished layout to check positioning when you start to put together. 

Start by turning over your treehouse pages to the B side - this will be your base layout. Cut the middle out leaving a  1.5 cm border. Put the middle cut out aside to use later. 


Trim the second treehouse page approximately 1 cm across the top and down on side. I used the general guide for the top so that the top of the balloon is on the edge. 


Adhere the smaller treehouse page to the frame with the B side (yellow side). I have distressed all of my edges first but it is up to you. Put aside. 

Cut out 3 photo mats from the photo mat page. I have chosen 3 that had a yellow edge but it doesn't matter which ones you choose. Put rest of the page aside. You wont need to use it again for this layout. 


Fussy cut from the left over middle insert of the treehouse page. Cut out the top of the treehouse (roof), the right side smaller treehouse house with the yellow teddy, ball an, boots etc. kite, tyre swing,  b&w racoon in the red cart and flowers attached. 

You will find that because you have trimmed the edges on the top and right hand side, your fussy cut pieces will be missing a bit on the edge. Don't worry - it will be ok. Distress pieces.


From the elements page, cut a spray of flowers with leaves and one of the banners. you can cut more and add in when you are finishing. Up to you how many extra elements you want to add. 


Once you have trimmed, distressed edges, you are ready to put your layout together. 

Start by adding your 3 photo mats across the centre of the page. I have mounted on a small piece of foam tape in the middle so that I have add other elements behind. These photo mats will help position all of the other pieces. I have them approx. 10.5 cm from the top of the layout (yelllow edge included) and approx. 3.5 cm from the left hand side and a .50 cm between each piece. In the end, you want to try and get them about equal from the left and right hand edge. 

Once you have adhered, slip the top of your tree house roof behind the top of the photo mats. It will sit higher than the roof on your layout so that you can see the top. This is an easy way of being able to still show features of the busy paper when you add photos. Mount with foam tape. Add all of the other pieces in and around the photo mats. Because you will have some edges trimmed smaller than the main piece behind, make sure you line them up so that they still sit directly on top of the pictures underneath. The kite will be missing the top edge, but put it under the photo mat to hide. This will be the same for the racoon. You will use the extra flower spray to put on top and hide the straight edge. 

Finally add words or journaling on the layout. I have put mine at he top but there is plenty of room to add words, titles etc. 

I hope you enjoy and if you would you would like a layout with the left over pieces, let me know. 


MT-CHL-03 Treehouse/Stars Childhood


MT-CHL-09 Fussy Cut Sheet Childhood