Friday, 4 March 2022

Always and Forever


Decoupage Papers - I love the decoupage papers but wanted to try them on my scrapbooking layouts. Would they work as a pattered paper? Yes they do. They make wonderful papers. 


Select a plain piece of cardstock. I choose white so that it supported the lovely colours on the paper. Trim the decoupage paper to fit your cardstock. Put the remaining piece aside. Using Decoupage glue, cover the card stock and lay your paper over the top. you will need to be fairly careful. smooth out so that all of the wrinkles and creases out. If you do end up with a few, don't worry, any mixed media will cover it. 


Put a side your layout to dry. Paint your wooden embellishments. I have used Coconut milk, Minnesota Pines and Global waters. Cut out your fimsy sheet flowers. I used about 3/4 of the flowers. Prepare your photo. I have mounted on a piece of card stock and then remount on another piece of card stock which is covered with the remaining piece of decoupage paper 


Do some stenciling on your paper, add some watered down chalk paint to add colour to the stenciled areas. I used selected chalk paint colours that complemented the paper. Once dry start to assemble your layout. Layer the Flimsy flowers and chipboard. Finish off with some Arty Stones and flick some coconut milk paint over. Remember to cover your photo. Add our Word. 

Hope you enjoy the layout and for more iCraft product info please click on the website below. 

https://tinamarie.com.au/shop


Sunday, 21 November 2021

iCraft Shady Fold Album - Rosalie Duke-Stanley


The ready to go album templates are perfect for embellishing and decorating to create lovely small photo albums. They come in black or brown templates and easy to paint or cover with patterned paper. This album holds up to 25 photos and other memorabilia that can be kept in the pockets. 

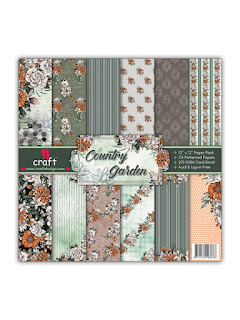
I used the brown template and County Garden paper range to decorate. Select 4 different pattern papers x 2 each. I also used one of the patterned papers that was suitable for fussy cutting a range of flowers and petals. 

Start by measuring up all of the pieces. I found it easier to use a corner rounder punch for the curved edges. 

Wooden embellishments - I painted the filmstrip and uneven pavers in off white chalk paint - coconut milk. You may need 2 coats. 

Adhere all of the main pieces to form the folding album and photo mats, leaving the front and back cover aside. It is easier to decorate them first before sticking them to the album 

Front and Back Covers - start by layering the flowers and wooden pieces and a slight different front and back. Remember to leave room for the flip closing tab. Layer some petals around the layout and finish off by flicking some chalk paint over the top. 

Stick all of the remaining pieces into the album. I used a dark brown ink (pinecone) and coloured all of the exposed edges covering the template. It also adds a rustic look. 


Add photos and other special items in the pockets and photo flaps. Tip - I cut up a flexible fridge magnet and stuck it to the front cover and tab to close the album. 

Below are some of the pages in the album. 


My tips for creating the album together can be used for all of the iCraft range of albums. 

For more information and products, click on the featured products below or the link to the iCraft Australia products. 

https://tinamarie.com.au


Friday, 5 November 2021

Toddlers Story Frame - iCraft Australia


The window frames with shutters are perfect to make lovely photo frames for your special baby photos. I have used a lovely photo of my granddaughter Amelia. I wanted to create a cute frame to put on display.

I used 2 different patterned papers from the 8 x 8 The toddler's Story paper pack to cover the frame and shutters. Tip: when covering the shutters, pencil around the shutters to get the approximate shape. Don't worry about cutting out the rectangle pieces between the shutter panels. Glue onto the wooden pieces making sure that you glue securely to the edges. Leave to dry completely.  Once dry, carefully cut the pieces of paper between the negative spaces on the shutters. I used a craft blade and placed facedown on a cutting mat. Glue a second patterned page onto the base and square frame. Distress the edges. There is an extra piece that comes with the frame - window frame insert. I haven't used it however save for another project. 

Cut out a range of figures from the Elements sheets. I cut out about 10 pieces. Layer onto of the frame, moving around until you are happy with the layout. My aim was to layer some pieces on top of each other. Once you have happy with your layout, start gluing down and using foam tape to add height to the top pieces. Having some pieces slightly over the photo ties adds interest. 


I hope my fun little frame inspires you to give the lovely wooden embellishment frames with shutters a go. They are perfect for lots of different projects and photos. 

For more information and products, click on the featured products below or the link to the iCraft Australia products. 

https://tinamarie.com.au


Thursday, 21 October 2021

Bloom De Fleur - Rosalie Duke-Stanley


The Bloom De Fleur is a gorgeous paper range that you can fussy cut the bright flowers and team with a variety of background pages from the collection. To add interest, I used cogs that are normally on grungy or masculine pages however thought that they were perfect for pretty pages as well. 

I selected two different pattern papers - stripes and dots - to add contrast for the background. Fussy cut a range of flowers. Paint the cogs in Chalk Paint - Coconut Milk. You may need to paint the cogs twice to cover them completely. The word was painted in Roman Purple as a nod to the purple wisteria flowers featured under the photo. 

To put together, place the photo (matted on a piece of iCraft wooden embellishment that was from a frame used in a recent creation) to the right of the layout. Remember to leave room for flowers and cogs between the photo and edge of the page. Place the flowers across the page to cover up the join between the background papers. Make sure to add a few flowers up one side so that it adds interest and doesn't end up being a straight line and a few under the photo. Once in placed, glue down and raise up the top flowers with foam to add depth. 


Slide the cogs under the flowers. I cut some in half to add more around the flowers. The aim is to have them just visible. To finish off, use a paint brush and flick chalk paint - coconut milk on the striped background and add fine pieces of gauze underneath some of the flowers. 


I hope you enjoy my layout and good luck with your own creations. 

For more information and products, click on the featured products below or the link to the iCraft Australia products. 

https://tinamarie.com.au


Tuesday, 5 October 2021

iCraft Australia - framed cuteness


Sometimes  you just want to create some framed cuteness. The beautiful Bloom de Fleur is a beautiful paper range with some lovely papers that are just perfect for fussy cutting and creating smaller projects. 

Making these smaller projects is a great way to experiment with paints, stencils, mediums and try out different techniques. 

I started with the wooden square frame and painted with iCraft Black gesso. Once dry, painted the base with the beautiful blue 'global waters' chalk paint. Using the Decoupage Papers - Monochrome, tore smaller pieces and glued to the base. You will still see the blue chalk paint through however it breaks up the colour. Add more texture by stenciling some blue and white chalk paint on the decoupage paper. Once dry, flick watered Global Waters paint to add more interest.  


Cut a range of small pieces from the paper range including a square tab, butterfly, flowers, words and  bumble bees. I cut out the smaller flowers to compliment the size of the butterfly. 
Start by layering the larger cut out pieces on the base and then mount the butterfly on foam tape to raise up. Glue the flowers on the edges. You may need to trim and layer to raise up. Glue fine lengths of gauze under the butterfly to add a whimsical look. Finish off with the bumble bees and some arty stones on the edge of the flowers, gauze and butterfly. 

My final touch was to add some watered down silver chalk paint  on the frame to add a hint of colour. 


Below are some of the products used in this project. Click on the item to link to the iCraft products. 

For a full range of iCraft products, please follow the link bellow:


Tuesday, 21 September 2021

iCraft - Cuteness, Love and Flowers


The beautiful iCraft paper range called Country Garden was perfect for a layout with lots of fussy cutting. 

Prepare  your wooden embellishments with chalk paint. For the honey comb pieces paint with Minnesota Pines mixed with some white gesso. This creates a softer green to compliment the back ground colours.  Paint the words and heart arrow with the full colour of  Minnesota Pine. Add some lightness, use watered down white gesso to take down the solid colour . Paint the leafy wooden pieces, with Deep Waters. Once dry, dab watered down white gesso to add depth to the painted surface. 

Assemble your layout - mat your photo on 3 pieces of complimenting papers and use foam tape between the layers. I always align slightly off centre which adds a feature to the layout. I started with a base paper that also featured flowers and added in a range of fussy cut flowers of various sizes to sweep the blooms from the top left around the photo and bottom right up on the left hand size. Arrange your flowers on the layout adding some foam tape to raise the top ones to add depth. Once adhered, slide the wooden embellishments under the floral arrangement making sure that is is off centre. To finish off, I added some watered down Deep Waters chalk paint under some of the flowers to add depth to the background. 

I have added some close up photos of the layout and some of the products used. 

For a full range of iCraft products, please follow the link bellow:

https://tinamarie.com.au


  https://tinamarie.com.au/product/wooden-embellishment-i331/